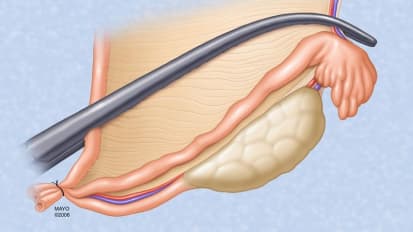
Erick D. Bothun, M.D. , a pediatric ophthalmologist at Mayo Clinic in Rochester, Minnesota, performs a cataract extraction for a pediatric patient experiencing uveitis with a cataract blocking vision in the right eye. Watch Dr. Bothun perform this surgical procedure and place a new intraocular lens to improve the patient's visual clarity and quality of life.
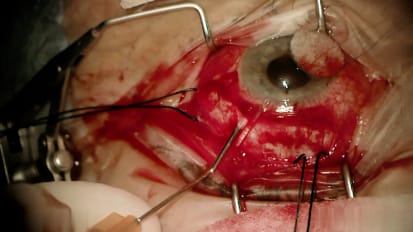
All right. So as we do in all the pediatric cataract cases, we'll place a super attractions, future calibri else nick, hand over hand. So for a subtraction suture underneath the super rectus insertion, it provides just a little safety for later in the case. For I positions. Try pan. Blue would be optional in many cases like this where you could probably see it but it adds that extra confidence in the clarity. Sometimes try pan wants to leak out and I just put a little pressure on that spot. The duration of leaving it in is optional. My routine is just leave it in for a minute. You get a nice stain. So try pan gets rinsed out. Helen goes in. I always think trying to advance the healing to the other side of the chamber and fill as you come back is a good routine. So healing to the eye across the eye and filling as you come back. But starting the terror is pretty standard. I would just pull more, try to continue it in around away from there. It'll round out as you go in. You might find the wound. Destiny's is somewhat tight, so just rotating that instrument has an anterior vertical. You'll get in much easier and you won't have that pop as you catch Destiny's pinching close to where the wrecks ist is is great control and I'm always okay if it's a little small areas that we can always enlarge it easily later entering the aparecen tcs sometimes tight and you're angling posterior lee gets you underneath that tight decimated. So sub incision aly removing cortex. first positioning the ports and the peripheral cortex and then holding it steady and using aspiration to break that. Make a cleavage or a cleft in the peripheral cortex to get it to start aspirating beautiful. And then you work off that position either way and notice I don't drag the instrument and pull the cortex away as much as aspiration. So here we can switch by manually or do what's sub decisional. Always careful not to go into posterior with support here and just more tucking under. Keep irrigating irrigating to keep the chamber deep enough. I tell my fellows to listen to that tone. You will realize what vacuum level you need to create peripheral cortical action and anything less than that won't achieve the results. So position, report and take the vacuum up to that same tone. Important to make sure at this point that the instruments aren't pointing posterior really because the poster capsule can come forward quickly. Using the vacuum little bursts like little waves of aspiration using your second instrument sometimes can help move the cortex around. So some degree of capsule polish is often needed for these. These cortical fragments nice to start the vacuum before you go back to the poster capsules so start aspirin now and then you go back low level so you see how it's gonna move. So instead of putting your instrument on the poster capsule and the cortex and then aspirating and getting a sudden shift you start the vacuum mode up above and go back to it and you can just have a more controlled poster capsule position nicely. Their excesses already becoming around the capsule excess initially might wonder if we needed to adjust it and we still can, but it really rounded out beautifully. So here we're entering in the previous paris synthesis site straight and straight out for R. D. Cartridge. Sometimes at this point double check again if we need more Helen but if it looks stable we're going to load the lens these characters that look like little airplanes with landing gear and the landing gear face down to make sure that the lens stays upright. So again we tap this front edge just like that to get it to come beautifully right over the lens. You slide the lens in, get it to bowl, put down like a depression in towards the eye here as a taco tuck the back lens in beautifully done. Now we push the whole lens forward all the way until you get a hard stop. There it is. And now we're ready for the insertion, dialing the lens in watching that first haptic unfolding beautifully horizontally into the capsule and then leaving the style it in a little extra longer to push that back post your shoulder underneath the excess before you take it out allows you to relax and let go when you take this out. You don't need to be as rush. Getting a sense key hook in place. I usually close the primary wound 2.6 millimeter wounds with two sutures. We could do to, you know, Nylon or to 10 Oh Vicryl here we're choosing 10. Oh Vicryl will use the same for the paris synthesis. These can be removed at a week or left in place and here's where you push back on the Iowa a couple of times to make sure you got everything coming around it. Good. Beautiful. And so you can recenter it there and then we'll take those out. I usually go in, go in first and beautiful and then we'll go on Big Macs and give that a swirl as an inter camera protection. It also breaks up the trash bins nicely to make a nice snow globe. Wonderful. Thank you everybody. Successful case. Mhm. Okay. No, mm hmm.
Related Presenters