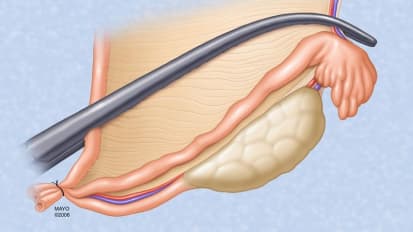
Arthur J. Sit, M.D., M.S. , an ophthalmologist who specializes in glaucoma at Mayo Clinic in Rochester, Minnesota, is a glaucoma specialist. Here he inserts a Baerveldt drainage device for a patient with refractory glaucoma. Watch as Dr. Sit inserts the drainage device underneath the muscles of the eye and passes a tube into the anterior chamber of the eye to release intraocular pressure and control the patient's disease.
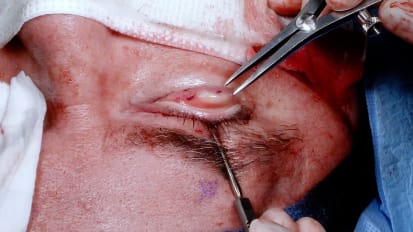
so putting a corneal traction future and so let us rotate the eye into position. Making an incision four back gives us a nice watertight closure at the end. Just dissecting underneath the keenans layer. Now creating a space for the tube. We're now going to isolate the muscles of the tube. It needs to go underneath the muscle so we need to be sure where they are. That was the superior rectus muscle and we're going to isolate the lateral rectus muscle now, mm hmm. Okay, so now that we've isolated the muscles where we can start preparing the tube for implantation and then litigate the tube so that we don't have excessive flow and and low pressure's at the beginning the postoperative period. We've achieved team of stasis. We're going to place the tube that we prepared. It goes underneath the rectus muscles so we have them isolated. So like one up. I slept with you underneath and the other side will slip it on other muscle. Check that she was free to move post early. Make sure that it's locked it unless there's a material in which we see that it is. The next step is we need to suture down the tube to the sclerosis. I wanted to be at least 8 to 10 millimeters from the limb bas. Make sure that the tube is stable. A little bit of play their 1.1 to put in a third anchoring suture. Alright so we don't want to trim the tube to the correct length. Market at one millimeter of a million members quaintness and then we're going to make a passage for the tube into the anterior chamber looks like about the right length. It's nice and posterior just anterior to the virus, and that looks good. Yes. So since the tube was litigated, we actually want to lower the pressure immediately immediately. So we're going to make a little hole in the side of which you defenestration and you can see here is a nice little trickle from the tube. Okay, so the tube is in place, so we're just going to start closing up now, It's nice. Okay, so we're all done, my goodness.
Related Presenters