Mayo Clinic otolaryngologist Kathryn M. Van Abel, M.D. demonstrates the transcervical approach to the parapharynx for excision of a deep lobe parotid pleomorphic adenoma.
Kathryn M. Van Abel, M.D.
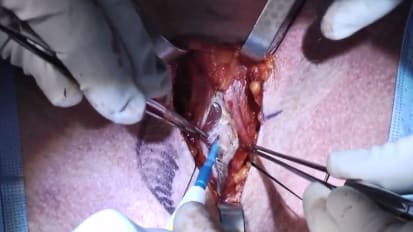
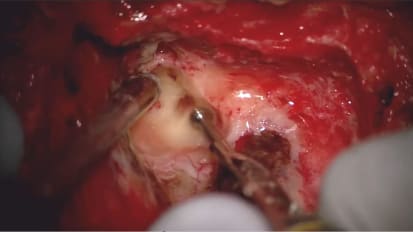
Hello, my name is Katie Van Ebel. I'm a head neck surgeon at Mayo Clinic in Rochester, Minnesota. Today we're gonna talk about transcervical approaches for para space leamer Anoma. We will focus today on the surgical approach for these tumors. But for more information about the work up and the characteristics, please see Doctor Moore's excellent E N T in a nutshell podcast on this topic here, we have a patient who presented to me in her mid twenties, uh who had undergone work up for headache and had incidentally been noted to have a paraffin jail space mass. As you can see, this is bright both on T one and T two. Uh and you can see it is deep to the mandible and the paraffin jail space. When we went to the operating room, we positioned her soup pine on the table with a four lead facial nerve monitor in place. I like to use a nasal and a tracheal tube to ensure that I have adequate access uh to a peripheral space by allowing her teeth to completely close. We start by looking at our superficial anatomy, marking out the angle of the mandible and our planned incision. We wanna be prepared for all the possibilities in the operation, which includes the potential need to do a formal paradac toy and uh facial nerve dissection. However, uh my approach typically will uh focus on the transcervical uh incision. So I mark that out inferiorly. Uh I like to mark out where the external jugular vein goes so that we can try and avoid injuring it with the uh injection. I inject 1% lidocaine with 1 to 100,000 epinephrine as my vasoconstrictor. Uh then we paint uh and prep with our iodine prep. I think it's important to uh pay attention to your draping. We wanna be able to ensure that we have access to a clear view of the face to monitor for facial twitching. Uh But we also want to be able to have some mobility of the head so that we can turn it side to side if and when we need better access. Next, I like to place intermaxillary fixation screws so that we can actually pull the mandible forward uh to create the maximum amount of space uh for access to the peripheral space. This is relatively well tolerated, ensuring that we place it in between the dental um roots and well away from the mental nerve uh placing the maxillary screw anterior to the mandibular screw, trying to uh measure to estimate the maximum amount of forward protrusion of the mandible. We use our standard M M F wires. Uh This can be 16 or 18 gauge. You can see that as we set this down, we're pulling the mandible forward. Um You do this just as you would for any uh mandibular trauma or midface trauma, uh setting the, the wire down tightly and then trying to fold that in, in a canine fashion to avoid any inadvertent injury to your assistance or to the patient's uh oral cavity. Next, I like to use Tegaderm to cover the mouth and nose to ensure that we have a sterile field. We'll change our gloves and then proceed to the parapharyngeal approach. We begin by making an incision with a 15 blade through the skin, the subcutaneous tissue and then through the plasma more anteriorly, uh just posterior to the plasma, you'll typically find your external jugular vein and your great irregular nerve. Uh So it's often safest to start forward towards the plasma. Next, we'll start raising our sublet flaps. Uh You can see here that it's really critical that we have excellent uh retraction both vertically with our double pronged skin hooks as well as a posteriorly to 10 skin up. We'll work our way forward ensuring that we have raised flaps all the way up over the mandible. And then I will secure these with uh fish hooks which we use here in Minnesota, not only for fishing but for attracting the skin. Here, we're showing a nice view of the great irregular nerve, the external jugular vein, external clio master muscle and you can just make out the semi gland underneath the fascia. First, I like to define the inferior border of the submandibular gland. We can do this by raising the fascia, uh just inferior to it. Uh This helps protect the marginal mandibular nerve which will be uh in a position higher than this uh point of dissection. This will allow us to start identifying both our, our common facial vein if it's present, uh as well as our uh poster ability of the digastric, which will be an important landmark for this operation in this situation. Or in this case, the external jugular vein and the great irregular nerve sat posterior enough that I felt that I could preserve them without limiting my ability to access the paal space using a retractor. Uh If this were to inhibit my ability to access the surgical site, I certainly would ligate the external jugular vein. Next, we're going down to identify the poster belly of the digastric. I do this by uh elevating fas and uh moving through its bipolar cotter and sharp dissection. It's important to remember that the poster belly of digastric does not always sit inferior to the selar gland, but in fact, sits posterior to about the midportion of the body of the gland. Um This can be helpful uh when performing your dissection and looking for this muscle. This patient was particularly thin and had excellent anatomy. Uh So we can see our digastric coming out uh towards us very nicely here as we're dissecting, uh we can clearly see the poster border of the Seibu gland and then lying on top of our digastric muscle, the stylohyoid mus musculature. This is going to be an important landmark for us as we move uh superior to it and look for our external carotid artery. So here we're pointing out the post to your belly of the digastric muscle, the stylohyoid muscle, and as I pull the stylohyoid inferiorly, just superior to this, you're going to see the external carotid artery come into view. Now, this is a very reliable landmark and it's a really nice safe way to find the external carrot if you're doing a total paradac toy or a peripheral dissection. Now, this is a high flow artery. It's important that we have really good clamps on this uh this artery. Uh So this is gonna be tied with the surgeon's not. Now, there is risk for first bite syndrome by interrupting the sympathetics that travel along the advent of the external carotid artery. Uh by making this maneuver, however safe and adequate access to the peripheral space will be limited if you do not appropriately ligate uh the external carotid artery. As you access this space, as we move deeper in our dissection, we need to um move the post your belly of digastric and the style hyoid muscle inferiorly and retract it out of the way this is opening the space between the mandible and the post your belly of digastric, which is aided by the fact that we have a nasal tracheal tube and we have uh our IMF screws in place. The next thing we need to do is move through our stylo mandibular ligament. As the name suggests, this uh ligament spans between the styloid process and the mandible. Um It's something that's often felt more than it is seen. Uh Fortunately, in this case, we had a really nice uh demonstration of this ligament. It's more of a facial condensation. So you can see here that it's working a little bit harder to try and get through that tissue. Um And it really is our access point to uh finally open up our para space. All right. So once we've divided that, you can see that with a simple finger sweep, we can really start opening things up. Um As I pulled uh inferiorly, uh you can start to see some of the other styloid musculature come into view. This is our stylo glasses muscle recall that I mentioned that the stylo uh hyoid and the stylo glasses are separated by the external crate artery. You could just make out there the tip of the styloid process as we uh start working our way above the styloid process. Here. You can see our paraphernalia space mask presenting uh to us uh through our peripheral space. I'm gonna use blunt dissection. We'll start with a kitner. You can see that I'm constantly using my forceps in a closed fashion here. Uh So as not to disrupt the capsule of the tumor, we're working over the top of the styloid process there trying to free up any attachments circum frontally around this tumor. One of the key maneuvers when we're uh doing a peripheral space, dissection is blunt finger dissection. Now, it's important to keep in mind where your styloid process is because what you want to avoid is accidentally uh puncturing your tumor against your styloid process. So one move that you can do is uh to fracture the styloid process inferiorly. Uh you have to take some care to prevent uh a superiorly placed fracture line on the styloid process from puncturing your tumor. I work my way all the way around the tumor feeling for familiar landmarks like our skull based landmarks such as the spine of the sphenoid and, and uh palpating intermittently for uh our vasculature. As I start to work towards the peta of the tumor on the deep lobe of the parade. We can again, start working with our uh kitner uh trying to identify where that tumor is actually attached to the gland. I go back and forth between finger dissection, uh ensuring that I have everything nicely and circum friendly, freed up and using the kitner. And now here I feel with my finger that I'm really uh freed up with the exception of my, my pedicle. Uh So before I just pull that out, I want to ensure that I ligate this with a cuff of normal parad tissue. We recall that there is a risk for recurrence if we do not take a cuff of normal parad tissue. And in this setting, it's typically this peta of tumor against the deep blood parad gland. I typically take this with a clamp. Uh We can bipolar, cauterize the uh inter intervening uh para tissue and then I'll ligate the uh remaining parad tissue at our institution. We're able to send this for frozen section pathology and this confirmed our suspicion of a pleo pleomorphic Anoma. It was completely excised. And so this was the end of our operation. No further dissection was needed. However, if this uh came back as a malignant tumor, we would need to consider moving on to a total para toy and upper neck dissection uh for oncologic management depending on the grade of the tumor. Now, we can look at our anatomy uh deep within the wound. We can see the super constrictor. We can see our style glasses, stylohyoid and our digastric muscle. Uh This is a nice demonstration of the anatomy here. I like to place a drain. We created quite a dead space in this wound. Uh So placing something uh relatively small like a seven flat channel drain up into this defect, I think help helps to prevent fluid accumulation. I then close this in a layered fashion using 40 vir for uh deeps closing our plats together and reapproximating the soft tissue in a ti tension free fashion. Once this is complete, we can use derma bond to close our skin. Next, we'll remove our IMF screws using just an empty screwdriver and cutting out our wires. Um And this will bring us to the termination of our procedure. The key points for this operation are access. Uh So everything we can do to optimize our access will help us be successful in removing these tumors. So this includes nasotracheal intubation, uh doing something to help move our land forward. I like using IMF screws because I can avoid putting a retractor on the marginal mandibular nerve to pull my mandible forward. We need to remember our steps which include elevating our sublets flaps, uh moving inferior to our semi diar gland, identifying the poster ability of digastric. This will be pulled inferiorly as we work over the top of the stylohyoid and digastric muscles to access our external Caro artery. Uh we move through this stylo medi ligament uh to identify our tumor. Uh Then we use blunt dissection, taking care to avoid injuring the tumor on uh sharp structures such as our styloid process.
Related Presenters