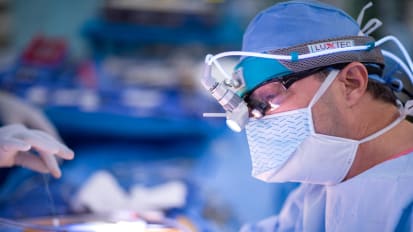
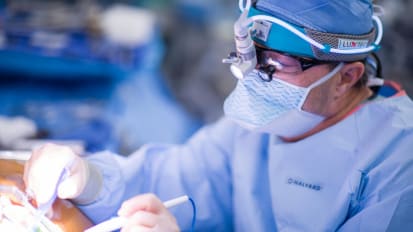
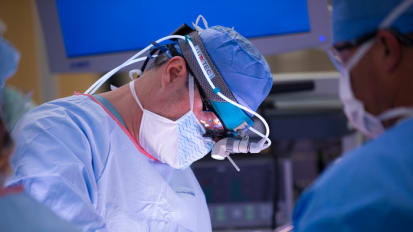
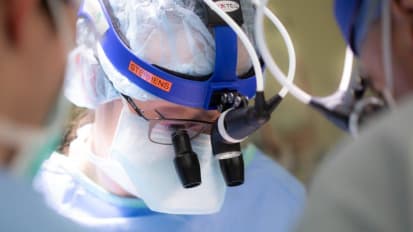
Mayo Clinic otolaryngologist Kathryn M. Van Abel, M.D. demonstrates a superficial parotidectomy with facial nerve preservation for a pleomorphic adenoma.
Kathryn M. Van Abel, M.D.
All right. Today, we're gonna be talking about superficial parad omy. It's one of the most common surgeries that we do during your residency training. And beyond the indications for superficial para omy are many. Uh we approach this area and we're looking for tumors within the para gland itself. And we're looking to see if there's any spread of tumor from something else such as a skin cancer in particular. Uh However, the most common reason that we do a superficial parad omy is when we're trying to remove a tumor from the para gland itself, the most common tumors within the para gland are gonna be benign. Uh We traditionally think of 80% of the tumors within this gland as being benign. 20% being malignant. The most common tumor that we remove from the period gland is a pleomorphic Anoma. And we're going to be reviewing the reception of a pleomorphic Anoma. In the following case, as with many cases preparation is key. We want to think about the um monitoring uh that we do for facial nerve dissection. This requires placing a four lead facial nerve monitor. There is data that placing a facial nerve monitor does not improve the safety of the operation. Um And it's always important that the surgeon operates based on their understanding of anna of anatomy and not necessarily based on the feedback given to them by a facial nerve monitor. However, when using a monitor is imperative that you understand how it works, we typically place four leads, these need to go through the muscles of facial expression. So not just through the skin, we place the red near the lip. So think red for lip blue, for eye purple goes on the chin and you can think of this as purple heart award. So it goes down by the heart and then orange is the only one left. So it goes up on the forehead. You have to place two leads separately from two leads. Also need to be placed uh separate from the face and these are considered your grounding leads. There's a green and a white needle. These should be separate and not touching each other. Typically, we place these in the shoulder and these will be uh inserted into your facial nerve monitor box, which we'll show you shortly with all of these. We typically wrap at least one loop and then apply a Tegaderm over the top. This allows uh for a, a fail safe. If someone were to tug on the wire, then we would know that it wouldn't pull the needle out first. It would just pull the wire loop each of your leads should be placed into the corresponding color coordinated part on the box and then the green and the white lead uh should be placed accordingly uh so that you can get good stimulation. Next, we have to set up our nerve monitor and which is being shown here, you need to make sure that it's uh set up for the four lead facial nerve monitor. Each of your muscles is giving you proper feedback and you can go to your monitoring section uh or monitoring tab at the top of the box. And you wanna look and make sure that it's set up at one milli amp and 100 micro bots. Um Then when you tap on each lead, you'll see feedback in that specific uh muscle. So you can see here that all of our leads are functioning properly. Next, we mark out our incision. This is gonna be a pre irregular incision with a modified face lift approach. It's important that you think about right angles, a right angle underneath the ear, a right angle at the hairline and a right angle where it would come back to form your neck incision. The neck incision should be made two finger res below the man mandible. Thinking about where the angle of the mandible is and where your external jugular vein is. Next, we inject 1% lidocaine with 100,000 epinephrine uh taking care to do this in the subcutaneous uh area, not deep within the subcuticular tissue. Um The difference is that we want to make sure that our skin doesn't bleed, but we don't need it down in the soft tissue where we'll be dissecting through. Often, you'll be doing cases for a free flap where you want to make sure that your external jugular vein is kept safe uh to avoid puncturing the vein. You can just skip over the area uh where you see your vein. Next, we begin with our prep. Again, preparation is key. It's hard to do your operation if uh somebody's hair is in the way. Uh So we're going to start with placing uh a wide paper tape over the ear on either either side, making sure that it connects on the forehead and has some contact with the skin. If you carefully peel this back, you'll see that this pulls all of the hair out of the way and then you can protect the ear to make sure that it's safe. Next, we do a standard prep with beta extending this all the way down to the collarbone to ensure that you're able to do a nectar section if necessary and extending over to the midline. Remember after you scrub to do your paint, uh this is done uh with the same uh area in mind, dry and remove your towel carefully to make sure that you don't contaminate the wound. Next will begin draping the person who preps typically lifts the head and then your scrub tack will be able to place the towels underneath this for their head draped, the head drape gets draped around and they consider where you prepped to. So make sure that you prep a little bit a larger area than you think you need. So that way if the drape slips a little bit, you know that you're protected, the next step is squaring out your surgical field, taking care to prep all the way to the side and all the way down in case you need to do a neck dissection. When you place the drapes, there's a sticky part that you want to extend down to the head rest but not the head itself. So you can move the head side to side during surgery. Next, we'll begin with our incision. You wanna make sharp right angles at each of your corners, keeping your uh knife perpendicular to the skin. When you make your post irregular incision, you lift your ear lobule out of the way and again, right angles at the infra portion and the post irregular portion. Next, we're gonna place double pronged skin hooks and then try to identify our para fas this is underneath the smas. So you want to be looking for this layer as well. Keys to this step are good retraction uh of the skin upwards away from the wound and then the back traction that your assistants providing or you're providing with your index finger and then the countertraction with your thumb within the ear. You wanna keep your tips up until you get over the top of the para gland and then some providers continue with snips and some go with spreads. Uh I think it's nice to use a spread so that you can look down to see if you can find your mass or muscle. Next, we're gonna start working, um, underneath the ear to try and find our great irregular nerve. Once you find the nerve, you're gonna follow this superiorly towards the ear, uh dissecting up and laterally, uh so that you're able to dissect the entire course out up to the ear and protect the post iri branch. Next, we're going to ensure with this face lift incision that we have adequate exposure. It's important that you're over the entire parad gland. Um And in this area, you want to be looking for your external jugular vein. And this part, it's nice to be able to uh cut sharply uh to divide the external kind of mastoid muscle and keep that muscle intact and down. Um And that's why it's nice to have your great irregular nerve exposed so that you can cut here with confidence. Once you have adequate exposure, you're going to use uh at least three fish hooks to give you proper retraction. The pretragal tunnel uh is important and it's important to do a wide spread. Uh making sure you get over the top of the cartilage you wanna be able to feel with your finger finger down to the junction between the cartilaginous and bony ear canal. And if possible down uh towards the tempo mastoid sutra line, no surgery is without bleeding. It's important to know how to control this. If it's in an area that you can't safely bipolar, you can simply place a towel. Now, we'll begin with our pre identifying our post, your belly of digastric. You wanna keep your posterior branch of your grato safe. And in view, while you're doing this part, you can use coterie to separate some of the tissue from in front of the ear. Uh making sure to protect your Graul nerve. You wanna palpate the angle of your mandible and think about where that position is to find your post, your belly of digastric. You want to think about the projection of the muscle between the mastoid tip and the hyoid bone, place your finger with the uh pad up towards the angle of the mandible and your fingertip should be on the post of your belly of the digastric. Here, you can see the post of your belly coursing appropriately from the highway to the mastoid right underneath the angle of the mandible. Then we can start dissecting back up along the post, your belly of digastric towards our mastoid. Now, we have our pretracheal tunnel and our poster bell of digastric and we can start dissecting through the soft tissue between these two points. Typically, we like to use blunt dissection and you want to cauterize only if you know that you're up and away from the nerve. We wanna use a mosquito and some good retraction here to start working bluntly through this tissue, you wanna spread and only take tissue that you can see through so thin tissue, which you know is not going to be the nerve. Your assistant should always bipolar parallel to your tips and pull away slightly from the tissue underneath to ensure that they don't pass point or accidentally cauterize anything underneath the area that you're presenting to them. Similarly, with the scissors, you wanna bring your scissors in parallel to the mosquitoes and ensure that you can see the tips on both sides. So you know what the blades of your scissor are cutting through as we work through this tissue, we're going to work on a broad front ensuring that we don't dig ourselves into a hole so that we have the best chance of finding the nerve and protecting it. Many people talk about whether to leave some parad tissue or to try and dissect all the way behind it. It's OK to start marching your way anteriorly through the pro tissue to find the nerve. And if you need to, you can take the remainder of the tissue afterwards. When dissecting out the main chunk of the facial nerve, you have to think about your landmarks. The most common landmarks we use are the tragal pointer which is the medial most point of the tragal cartilage is the pointed end of the cartilage off of the external auditory mutu. The nerve exits the frain uh approximately one centimeter deep and one centimeter inferior to this point. The second landmark people talk about is the digastric ridge. This is where the post your belly of the digastric attaches to the mastoid tip. The facial nerve will run at the same depth below the skin surface and bisect the angle between this muscle and the styloid process. Next is the is the temporal mastoid sutra line. This is the actually the most precise landmark for the facial nerve as it leads immediately directly to the stylomastoid for ramen where the facial nerve will exit. The next uh landmark that you can use is to do retro retrograde dissection to get yourself back from one of the peripheral branches to the main trunk of the nerve. And finally, one can work from the mastoid. So drilling out the mastoid via mastoidectomy to find the main trunk of the nerve and then follow this out into the soft tissue of the periodic gland. Once you found the main trunk of the facial nerve, you want to uh identify the Pez anis. This is where the main trunk of the facial nerve branches into the upper and lower divisions. You place your uh mosquito onto the mastoid tip and rock on the mastoid tip so that you don't put pressure onto the nerve itself as you do this, you're going to lift up and out and peak underneath the bridge of tissue you create to try and identify that Pez anus. And you can see that the upper and lower divisions are now visible. Then depending on where your tumor pathology is, you'll either dissect out the upper or lower divisions. First. You want to do this by bringing the tips of your mosquito along the top of the nerve and then coming up and out laterally away from the main bunch of the pro and tissue, allowing your assistant to bipolar and cut. As we've discussed with each step, you continue following along the main trunk of the nerve. Um and along each of the major branches working your way uh from the most peripheral section that towards the central section of the product tissue. Um You wanna make sure that you can see your nerve down. We often tap with the bipolar to see whether or not we get any facial twitching or uh feedback from the facial nerve monitor. One of the critical techniques in product surgery is tension, counter tension as you dissect out your nerve and making sure that you don't put pressure on your nerve and injure it while you're dissecting along it by placing a finger on the uh proximal proximal part of the nerve and pulling it towards you and having your assistant using their retractor to provide you some uh counter tension. Uh You can use your mosquito and rock on your finger as your full crumb to dissect out the nerve. Next. It's important to palpate your tumor and always keep it in mind as you're doing your dissection. You never want the tip of your mosquito to ever go into the, the tumor accidentally. You always want to understand the relationship of the tumor to the nerve underneath and using your fingers as a guide. It can really help you do this. You can see here that we're dissecting underneath the nerve. So I'm being very careful to keep the tips of my mosquito away from the tumor itself. But again, following our good TED uh dissection techniques, using tension and counter tension, trying not to fulcrum on the nerve itself, using my finger to provide back tension, keeping my tips away from the tumor. And in this way, we can follow out the nerve, which fortunately in this case is running underneath the tumor. Also in para surgery, you'll notice that despite our best efforts, the nerve often has a mind of its own and anastos annas and patterns that are unique to the patient itself. So you always have to follow the nerve and make sure that you connect from the main trunk or the Pez to the periphery outside of the tumor, you're going to work your way down along the nerve to try and identify each of the remaining branches. So, working your way inferiorly, we can see areas that are tinting. Um And once we know that we've dissected out each of those branches, we can turn our attention to the inferior division. It's typical to exchange places with your assistant at this point so that you're standing at the further most part of the top of the head. Uh and your assistant is below you to the right as we dissect the inferior division down, you always have to work around your retro mandibular vein. Uh The nerve can go both under and above this vein. And it's important to understand that relationship to pause and take time to investigate as you go around this uh vein. Uh Sometimes you can use a vascular force up to pick up the vein and ensure that you uh keep the nerve in your sights the entire time. It's often that we have little but blood vessels that go over the nerve. Uh And sometimes it's hard to understand how to manage these. Typically, we try and avoid bipolar right on the nerve. And so you can grasp this and bring a clip in making sure you clip away from the nerve vasic to stop the bleeding. If you're ever nervous about this, you can simply wait, apply pressure and most bleeding will slow down or stop. After we've dissected out the in superior and inferior division, everything will be pled on the midface branches. You wanna make sure that you still dissect out any large branches until you can see them go all the way from your Pez or your main trunk uh to the periphery outside of the range of your tumor. You can see that there's a three dimensional landscape that you're operating around and you want to make sure that you adjust the angle of your dissection to that landscape, both coming up in front of the uh maci or muscle and then going uh down um and transversely as you go over the top of the uh mound of the pratted tissue. Now we're holding the uh para gland in the tumor in between our fingers. Uh So you take it from your assistant and you work horizontally through that tissue until you find oh the duct, you'll clamp this uh and you can uh cut the part that goes towards pathology and then tie off the duct to prevent any infection. It is not unusual to do a superficial ectomy and not find the duct. Uh You don't need to go looking for it unless there's, you're doing the pro toy for a chronic infection. In that case, you should look for the duct and ensure that you ligate it. Remember that several buckle branches will be uh closely adherent as in this case to that duct. And so it's important that you've dissected out each of these branches and make sure that you keep them safe. This completes the superficial perect toy. You can now see that we have a nice network of nerves, uh well exposed, you then irrigate and remove any remaining blood clots and blood products from the wound. You can cauterize uh with bipolar Cotter to ensure that you have good hemostasis. Uh remembering to avoid cater, cauterizing uh or thermal injury to the nerve. So to review our landmarks, we have our Sianis, our inferior division, our superior division, our buckle and Asma division, the retro mandibular vein, which here is going underneath the inferior division and the marginal mandibular nerve, we've got our post to your belly of our digastric coming from the highway up towards our mastoid tip. We also have where, where our pretragal dissection was and our tracheal pointer out laterally. We have our great iri nerve. You can see there is our angle of our man just for reference. Now we'll remove all of our tractors, we'll remove our fish hooks and we will place a drain. You do this by dissecting underneath the skin out towards the hairline. Make a single stab incision into the uh skin. We can then pass a mosquito through this and then join this with a second mosquito and allow it to draw the second mosquito into the proper location. The drain is then passed through the skin, make sure that your drain hole is wide enough to allow the drain to come easily out but not so wide that it will slip out um and not function properly. We then place a drain stitch with an o silk suture. You want to do this by grabbing a decent amount of skin. So it doesn't come out through the skin, tying an air knot and then affixing this with a uh surgeon's knot to the drain, making it snug enough so that it won't come loose but not so snug that it kinks the uh tubing. I like to do this just at the first part of the taper. So that way um the knot is not so loose that it allows the thicker part to come out through the skin. Typically do two knots and do this in the Roman Sandal technique where you pass the uh suture around the back a second time, you pass the drain tube underneath the skin and then using a heavy mayo scissor trim this to fit your wound appropriately. Next, we begin with closure. Everybody closes their wound differently. I like to use 40 vir and close each of our points. First. You wanna make sure that you take the same amount of tissue on each side and try and line up our right angle. So we had a right angle here in the skin. You can mark this with a small nick at the beginning of your procedure. Uh But most of the time you can see this, if you look uh carefully for it, we always do a single interrupted suture, burying the knot. I like to snug it down and then pull the stitch toward myself to get the knot to lay down in the uh deep position. And then we do um, four knots and your assistant will cut down right on the knot, uh to try and bury the tail next. We're gonna close the uh post ire point. We do this in the same fashion. One thing you need to take care of is not to squeeze too hard with your forceps on the skin. You're grabbing, especially in someone who's at high risk for keloids. You can cause trauma to the skin and a worse outcome for their scar. This is done in the same fashion. We'll pull the knot down, do a total of four knots and then cut next, we'll close the uh triangular portion of the incision which we always place above the tragus. Um Again, you want to be careful not to squeeze this tissue too hard. It's uh easy to do. You certainly need to grab it, but um be sure uh not to squeeze too hard. It's also why we use the tooth forcep. So it doesn't apply a continuous large uh surface area of pressure onto the tissue. When you're closing, you wanna place enough stitches so that you provide strength to the wound. Uh but not so many that you strangle or injure the tissue. Um So we'll work uh sort of in it by having the uh different segments of the incision. And then uh closing this until we can't get an instrument between them. If you place a stitch and you don't like how it brings the tissue together. If they um sides are mismatched, you should cut out the stitch and replace it. Everybody has to replace stitches every now and again, this is an important part of closure. It's important that you stretch this incision out uh to its full length so that you adequately close uh and appropriately close each side of the incision. It's not uncommon for us to have bunching of the skin in this area. And I believe that with proper closure, we can avoid this for our patients. They haven't collected debris here and it's uh not very nice to look at. Uh, so having an assistant who can really uh pull that skin forward for you, uh to make sure that you get this lined up properly will help and it'll help your patient. You're often closing this by yourself without much assistance. But if you ask your scrub tech to help you with this, it will certainly uh uh be feasible for you. Then we continue with having our incision and closing until we can't get uh easily pass a force up between the uh two knots. I recommend always using a force up when you're closing and trying not to close with your fingers to avoid needle sticks. Next, you want blot dry and keep the blood out of your field as you apply your germa bond. This is the part that your patient is really going to see. And so if it's messy with blood and germa bond, uh they're going to, uh notice that, um, however often you can't avoid a little bit of blood under your germa bond, you want to keep it from dripping again because this is what your patient's going to be looking at. Uh, and that derma bond stays on, stays with them for about two weeks. Next. You wanna make sure that your drain tubing is working and that will complete your procedure.